How to Seal a Hole in a Bathtub with Silicone Sealant? A leaking bathtub can cause serious water damage if left untreated. At Simseal, Australia’s trusted sealing solutions provider, we recommend using high quality silicone sealant for a fast, durable, and waterproof repair. This step by step guide will show you how to fix a bathtub hole like a pro saving you time and money on costly plumbing repairs.
How to Seal a Hole in a Bathtub?
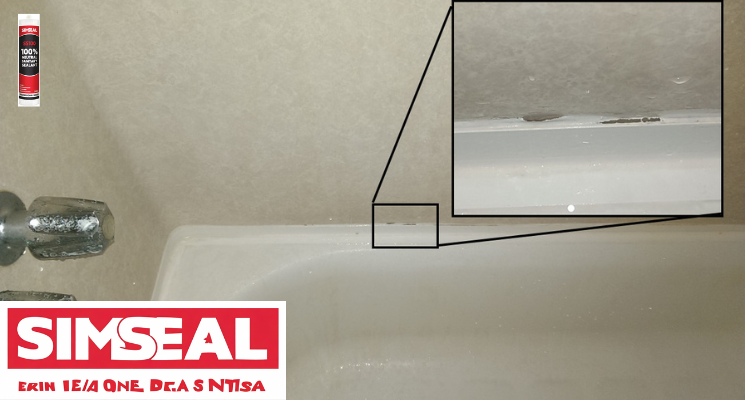
Silicone sealant is the #1 choice for bathroom repairs because:
- 100% Waterproof – Creates a permanent seal against leaks
- Flexible & Durable – Expands and contracts with temperature changes
- Mold & Mildew Resistant – Perfect for wet bathroom environments
- Easy DIY Application – No specialist tools needes
For best results, use Simseal’s premium silicone sealant formulated for long lasting protection in Australian bathrooms.
Tools & Materials You’ll Need
Before starting, gather:
- Simseal silicone sealant (choose a bathroom grade formula)
- Caulking gun (for smooth application)
- Painter’s tape (for clean edges)
- Razor blade or utility knife
- Fine grit sandpaper (180-220 grit)
- Rubbing alcohol & cloth (for cleaning)
- Bowl of water & paper towel (for smoothing)
Step by Step Repair Guide
Step 1: Prepare the Bathtub Surface
Clean Thoroughly
- Remove old sealant/debris with a razor blade.
- Wipe the area with rubbing alcohol to eliminate grease and soap residue
Sand Lightly
-
Use fine grit sandpaper to roughen the surface (helps adhesion).
Tape Off the Area
- Apply painter’s tape around the hole for a neat finish.
Step 2: Apply the Silicone Sealant
Load the Caulking Gun
- Cut the sealant nozzle at a 45° angle for better control.
Fill the Hole
- Apply steady pressure, moving slowly to avoid air bubbles.
- Overfill slightly you’ll smooth it next.
Smooth the Sealant
-
Dip your finger in water and glide it along the sealant for a professional finish.
Step 3: Final Touches
Remove Tape Immediately
- Peel off the painter’s tape before the sealant dries.
Let It Cure
- Wait 24 hours before using the bathtub (check product instructions).
How to Maintain Your Sealed Bathtub
- Inspect every 6 months for cracks or peeling.
- Clean gently with mild soap avoid harsh abrasives.
- Reapply sealant if you notice wear.
FAQs
Q: How long does silicone sealant take to dry?
A: Most sealants cure in 24 hours, but check the product label.
Q: Can I use any silicone sealant for my bathtub?
A: No. always choose a 100% waterproof, mould resistant formula like Simseal’s.
Q: What if my bathtub hole is too large?
A: For holes bigger than 5mm, use a repair patch before sealing.
Final Thoughts
Fixing a bathtub hole with silicone sealant is an easy, cost effective DIY job when you use the right products. Simseal’s high performance sealants ensure a watertight, long lasting repair, protecting your bathroom from leaks and damage.
Got questions? Contact Simseal’s experts for advice!
For professional advice please Contact Sealem Solutions.
Recent Comments